
|

|
Stretching paperFor this task, we started by getting a clip board and a piece of water colour paper, which has a heavy weight so it can absorb a lot of water. We then got a tape called gum strip, where we cut two long, and two short strips to stick around the edge of the paper, we do this by putting the strip of tape in water, and then sticking the shiny side on to the paper. The reason artists do this is because after the paper gets soaked with water, it crumples up. But when we add the tape around it, it creates pressure so that when the paper dries it returns to its original, flat state.
|
|
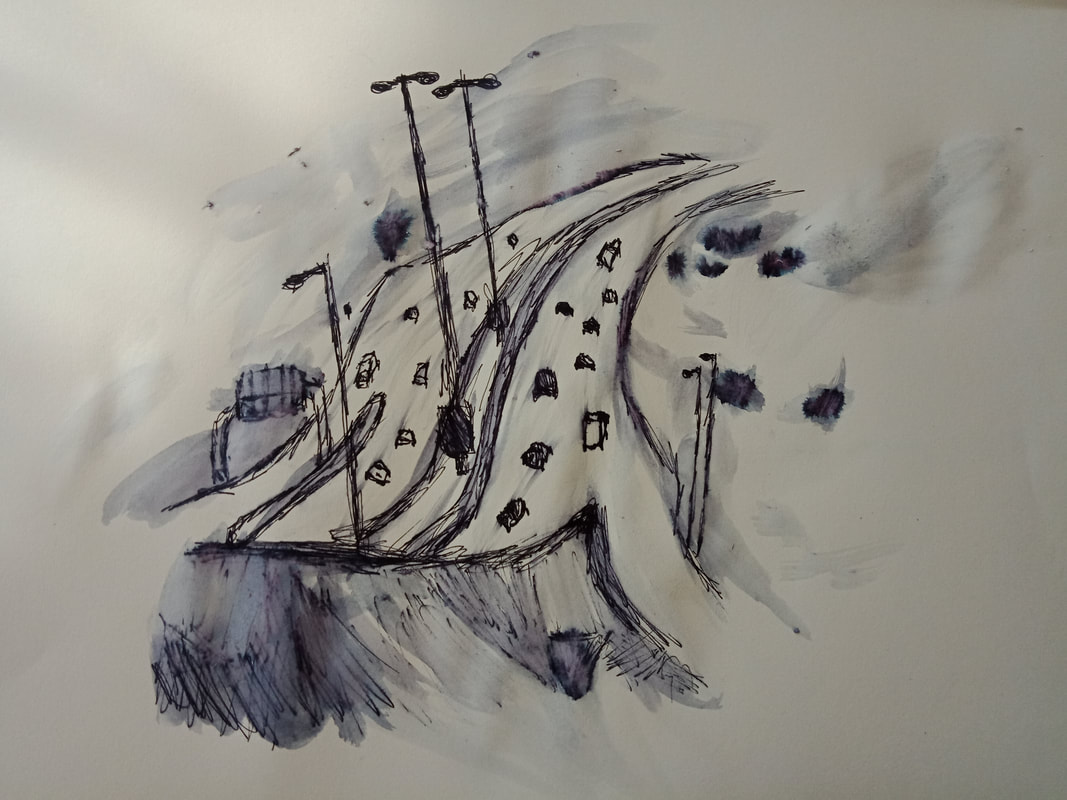
Ink pen and water landscape drawingFor this lesson, we tried drawing a scene of landscape from outside, using an ink pen and a brush to put on water. We had to use exaggerated strokes on the pen to make the drawing look more sharp, and make it clear to see that the person drawing it was moving their hand rapidly.
|
Investigation Task

|
"Fishermen at Sea", 1796, JMW Turner, Painting, retrieved from:
http://www.tate.org.uk/art/research-publications/jmw-turner/joseph-mallord-william-turner-1775-1851-r1141041 |

|
"Spiral Jetty", 1970, Robert Smithson, Earthwork, retrieved from:
https://www.khanacademy.org/humanities/art-1010/minimalism-earthworks/v/smithson-jetty |

|
"Red leaf patch", 1983, Andy Goldsworthy, Sculpture/natural materials, retrieved from:
https://www.goldsworthy.cc.gla.ac.uk/image/?id=ag_02756 |

|
"Pyongyang VI", 2007, Andreas Gursky, Digital Photography, retrieved from:http://www.andreasgursky.com/en
|
|
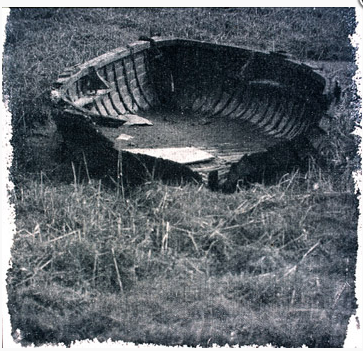
"The Boy Who watches ships go by", 2002, Ingrid Pollard, Photography, retrieved from:
http://www.ingridpollard.com |
Artwork comparison
The art pieces "Fisherman at Sea" and "The boy who watches ships go by" have some similarities but also big differences between the two art works. The first similarity is that both artworks include imagery of ships and have the same connotation of ships and the sea. However the major difference is that the first artwork shows chaotic storms and people being drifted by harsh ocean waves, whereas the second one is a lot more calmer, it uses no colours and is entirely grey. This also gives the photo a more sad or depressing theme, opposed to loud and chaotic. As well as the fact that in the first art piece, they are out in water whereas the second one shows an image of a boat stranded on land, and not in its natural place.
Jebel Sifah landscape photos


|
Water colour Landscape experiments/techniques For this lesson, we learned techniques with water colours and tested painting a landscape. The first thing we did was a "wash", which we made by lightly stroking the brush in one direction to create a background. While doing this, we tilt the paper at an angle so that the excess water comes down, where we dry the brush and use it to soak up the water. The paper we use for this weighs more and is thicker than regular paper, this is so that when it absorbs water, it doesn't bend and crumple when It dries. Next, we made a faded wash, which fades from one colour to another. The colour paint that we use for this is made of gum arabic and mixed with different colour pigments. We also tried other techniques that included using a brush to paint a wet spot on the water, and then painting a line using the water colours through the spot, this effect makes it so that the paint in the spot of water looks a lot more blurred and has a feather effect, whereas when its out of the wet spot its more sharp and straight. Another technique includes painting a wash, and then using a piece of tissue, dabbing it on the paint to create a cloud effect. We also used oil pastels, and then painted over it with the water colours, the oil pastel still stood out because water and oil don't mix. After trying out these techniques, we tried making some landscape paintings with mountains. Because the water colour was transparent, you could see a bit of the colour from the background in the mountain. And if you wanted the mountain to not have this tint, you could add more layers of paint and make it more opaque. In the end, I think I made good use of some of these techniques while making the mountains, using different colours, and transparency, I also added layers to the different mountains. I feel that next time I should experiment more with having the sky or mountains fade into different colours, or making more use of the transparency.
|

|

|
Watercolour landscape painting planningI started by choosing a photo from my library that we took at our trip to Jebel Sifah, and experimented with turning it into a landscape painting.
|
Final landscape painting

|

|
For my final landscape painting, we used the original clipboard with the heavy paper taped on to it. As I mentioned before, the paper is taped onto the board to stop it from crumpling and making it return to its flat state when dried. I started the painting by first sketching the outline of the rocks. I then painted them in colours of light and dark grey, as well as shades of red. If I wanted to make the rocks a lighter tone, I would add more water to the colour paints, and for darker tones I would use a less diluted amount of the grey colour paint. And then adding the dark shadows between and under the rocks. For the sea in the painting, I first covered the paper in water, and then created a wash over it with colour paint. I used the water to make the paint look more fuzzy/blurry, which was one of the techniques we used in the landscape experiments. I did this to create a similar effect of the water in the picture. In the original photograph, the picture was split perfectly in two by the rocks, and the sea. The reason I liked the photo so much was because it showed how the land and water collided with each other, and how the rocks went beyond the land and faded into the water until you couldn't see them anymore.
Thinking about thinking
1) When you look at a landscape whilst drawing or painting it is it different from our 'ordinary looking'.
In my opinion, yes. Because when your looking at a view, you look at the bigger picture. But when you're drawing or painting you try and focus on the smaller details/aspects of the landscape.
2) List the things that change whilst we are drawing/painting a landscape - for example the light can change frequently.
-People, cars and animals can move in landscape scenes
-The colour and clouds in the sky can change as time passes
-There could be fog or rain
3) Do you think we all perceive the world around us in exactly the same way? Explain your answer.
No, because I think someones opinion on something might affect the way they perceive it. Someone might think a landscape looks beautiful however someone else may see it as the opposite. Sometimes people can be influenced by something else and make them think that way. People generally also have different perspectives of things, as one person might see something as a lighter shade, whereas someone else would perceive it as a darker shade of something.
4) When an artist shares a piece of landscape art with an audience what is he/she sharing?
( you may be able to think of a few different answers to this depending on the artwork you are thinking of. If you haven't yet looked at the links to artists in the investigation now would be a good time to look at a few examples of landscape art to help you answer the question).
I believe that the artist has the capability of sharing their view/opinion of the world or place, how they felt at that moment, or share a specific idea with the audience.
Statement of intent:

For my next final landscape artwork, I want to practise more with using water colours, but also experiment with new things such as collages. My plan for this is to almost split the picture in half, one side using collage work, and the other using water colours. I also want to make sure that I use most of the techniques learnt with painting landscapes, especially with using oil pastels. This includes making a faded wash, using water to create a blur effect with the paint, and using the oil pastels. I plan to use these to help me focus on the more smaller details of the painting. For this, as the picture itself looks as if it is split in half between the rocks and the water, I plan to have the side with the rocks use collage work, and the water use water colours. I intend to do this to present the clear difference between the land and sea, like theres a border between them. I was also inspired to do this by "Spiral Jetty" by Robert Smith-son, where it shows the relationship between the two elements of land and sea. I want to use a faded wash for the water side of the piece, as I intend to create depth to the water, to really show how deep it goes, to the point where the rocks under the water slowly fade until they are not visible. For the plants in the water, I intend to use harsh exaggerated brush strokes to present how life flourishes under the water. And for the rocks, I intend to make them into a collage where the colour of rocks blend with each other, so it would go from the rocks with dark tones and fade into lighter tones, and shades of different colours. I do this to communicate my experience at Jebel Sifah, as it shows how lively it was, and how everything such as the trees, beaches and ocean blended into the same theme.
Mind-map:


|
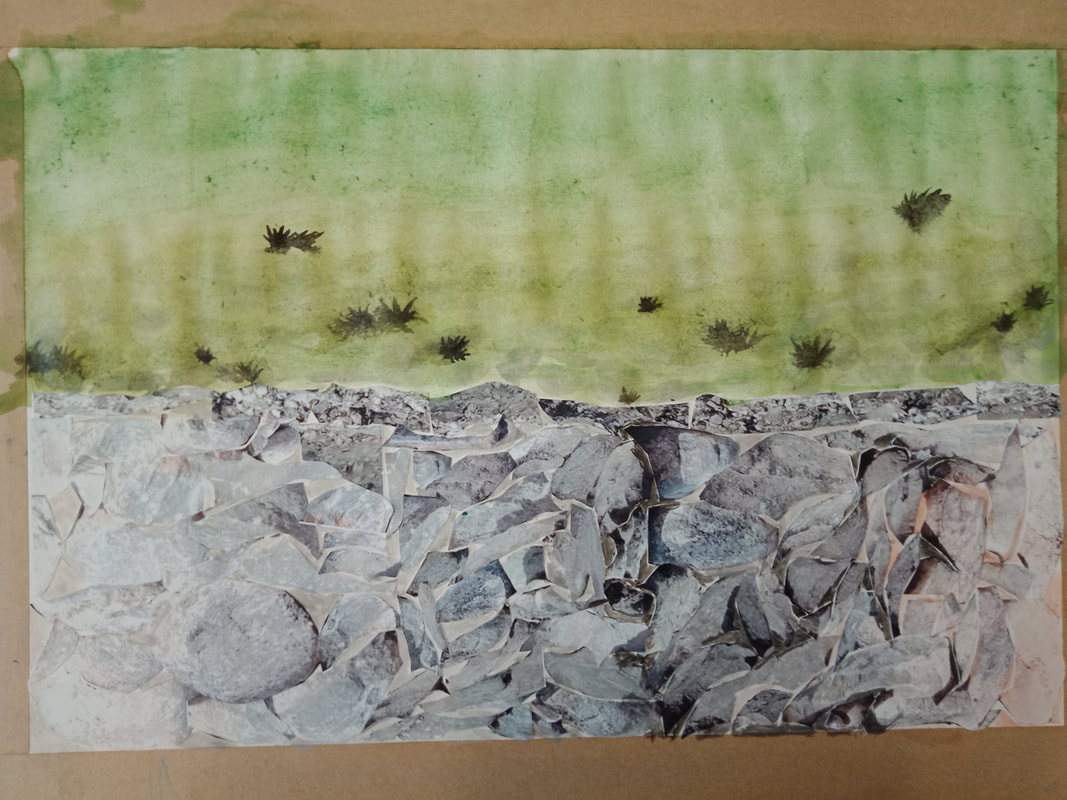
Design sheetFor this sheet of studies, I experimented with making an art piece from a different photo, along with my plan for the original photo I was working with. For the first piece, I started with painting the top half with water, and then covering it with the water paint to create the effect that the water was blurry/fuzzy. I also decided to paint the water first, as it makes it easier to paint the rest. I then sketched the rocks, and painted them as well. For this in particular, I tried to experiment with the effect of making the rocks fade into the water to the point where they are not visible, as shown in the original photo. As well as experiment more with the oil pastels. For the next art piece, I experimented with the collage itself. I was inspired by "Red Leaf Patch" by Andy Goldsworthy, an art piece from my investigation as I also tried to create the effect that the collage was made from the natural materials, but were re-arranged in a way that, for my art piece, smoothly blended from one colour to another, I tried to make it go from dark grey to one side, and slowly shift to a more red tone of the rock on the other side. In the end, I think I was successful in doing this. However I still need to improve on the effect of the rocks fading into the water.
|
|
Final landscape piece
For my final landscape art piece, I started by using my paintbrush to cover the top half of the piece with water, and then with the water paints. I did this to create a blurry/fuzzy effect for the water. I also decided to do this before making the other half of the piece, as otherwise it would be harder to paint while the collage was already stuck on. I started the collage on both sides of the painting, and worked my way to the middle. At the end, I think I did well with this part, as I successfully followed my statement of intent, making the rocks in the collage gradually fade from one shade or tone to another, with certain areas of white, dark, and even red. After doing so, I filled in the small cracks of emptiness between the pieces in the collage with water colours. However, to improve this next time I should print and cut out of multiple of the image, so that I can use it to fill in the cracks, and have extra pieces to be able to make the collage fade into each other better.
|
